MEDIA
General User's Guide
6.10 Controls
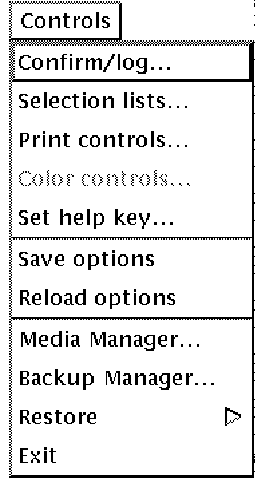
The Controls menu is used to set and save a variety of
controls that affect the operation of the Restore entire disk
module. The options may be saved and will be in effect the next time
the module is invoked.
6.10.1 Confirm/Log...
The Confirm/Log menu selection is used to determine
whether certain operations require confirmation and/or are logged in a
log file.
If a radio button is selected under the Confirm
column, a confirmation message will need to be approved before the
corresponding operation can take place. If a radio button is selected
under the Log column, a log file will be created and
displayed, indicating the operation was completed.
The operations that may be confirmed and/or logged are:

6.10.2 Print controls...
The default Print controls are set up by selecting Print
controls... from the Controls menu. See
Figure 4-7. The Print controls are described in Table 4-1.
Fill in the default Print controls and left-click the
[Apply] button to save the defaults.
6.10.3 Color controls...
The Color controls menu selection is used to change
the colors DISPLAYed within the MOTIF Work Center . In order to change
the form colors, select Color controls... from the
Controls menu. Figure 4-8 will appear.
There are four aspects of the interface controls that may be changed.
Table 4-2 displays these areas.
The interface controls that can be changed are shown in Table 4-3.
Select [Apply] to see if the colors are acceptable. Select
[Reset] to reset to the colors you started with. Select
[Default] to bring up the default color schemes.
6.10.4 Set help key...
On some terminals, the user may desire to map an alternate help key if
the default conflicts with a previously used key or key combination. To
set this option select Set help key from the
Controls menu. See Figure 4-11.
If the Standard radio button is selected, the keyboard
will use the standard help key as dictated by the internals of the
operating system.
To change the help key to a custom setting, select the
Custom radio button. Next, place the cursor in the
Enter help key field. Finally enter the key or key
combination that you will use to bring up help in the MOTIF Work
Center. The hex equivelent of that key will appear in the Key
symbol(hex) field.
6.10.5 Control restore via search...
The Control restore via search... selection is used to
set the operation of the Restore via search... item in
the Utilities menu.
To control the restore via search operation select Control
restore via search... from the Controls menu.
The form shown below will appear.

The Command file field is used to designate the command file that is
used to perform the search procedure. In most cases it is not necessary
to change this file. However, if you have a custom file that you use
for this purpose, enter that file name into the field.
6.10.6 Set help key...
On some terminals, the user may desire to map an alternate help key if
the default conflicts with a previously used key or key combination. To
set this option select Set help key from the
Controls menu. See Figure 4-11.
If the Standard radio button is selected, the keyboard
will use the standard help key as dictated by the internals of the
operating system.
To change the help key to a custom setting, select the
Custom radio button. Next, place the cursor in the
Enter help key field. Finally enter the key or key
combination that you will use to bring up help in the MOTIF Work
Center. The hex equivelent of that key will appear in the Key
symbol(hex) field.
6.10.7 Save options...
To save the options that have been modified in the
Controls menu as well as any Display controls,
Media selection or Search controls settings
that have been modified, select Save options from the
Controls menu.
6.10.8 Reload options...
To reload the saved options if you have modified the
Controls menu or any Display controls, Media
selection or Search controls settings, select
Reload options from the Controls menu.
6.10.9 Media Manager...
In order to run the MEDIA module described in Chapter 4,
select Media Manager... from the
Controls menu.
6.10.10 Backup Manager...
In order to run the BCKMGR module described in Chapter 5,
select Backup Manager... from the
Controls menu.
6.10.11 Restore
Opens the submenu to the other two restore procedures, Restore
entire disk and Restore via VAULT.
6.10.12 Exit
To exit the program and return to the command prompt, select
Exit from the Controls menu. If there
are other modules open focus will return to those modules.
6.11 Help menu
The Help menu is used to get help about the
Media Manager software.

Help may be obtained in several ways throughout the program. These are:
- Pressing the [Help] key on your keyboard while in a form
field or dialog box provides context sensitive help on that field or
form.
- Selecting the [Help] button on the bottom of forms
provides help on that particular dialog box.
- Selecting the Help menu from any of the five
interfaces:
- Media Manager
- Backup Manager
- Restore Via Vault
- Restore Via Search
- Restore entire disk
The Help menu provides two types of help. The first
type is the help overview. This gives information on many aspects of
the program from MEDIA fundamentals to the MOTIF interface.
The other type of help is the description of menu items.
6.11.1 Overview...
In order to get an overview of the program, select
Overview... from the Help menu. The
help module is shown in Figure 4-12.
6.11.2 Top menu...
In order to get help on the menus throughout the program, select
Top Menu... from the Help menu.
Part 3
MCL Work Center
This part of the General User's Guide describes the MCL Work Center
interface and it's use with the MEDIA program.
Chapter 7
Managing Media in the MCL Work Center
This chapter describes using MEDIA in MCL. There are
two options for limiting or increasing functionality of the menus in
MCL. The simplified menus are designed to give the user access
to an essential subset of the full function menu. Any functions that
need to be performed, which are not on the simplified menu, can easily
be accessed by switching back to the full function menu. In order to
switch to the full function menu, select Full function
menus from the Media Librarian menu.
7.1 Simplified vs. Full Function menu
The MEDIA menu structure differs depending on whether you have
chosen Simplified menus or Full function
menus menu from the main MEDIA menu. The simplified
menu offers essential media operations, enabling the user to perform
pool, job and report functions quickly. In this mode, the user can
operate on only one medium at a time. This provides an excellent
introduction to the Media Librarian's capabilities without the
complexity of more involved functions. In fact, the Simplified
menu mode will serve all the needs of most General Users.
The full function menus offer the full range of media procedures
including multiple media functions and volume set operations as well as
all the functions in the simplified menus. When the user selects
Media library functions, one of the two menus shown in
Figure 7-1
Figure 7-1 Simplified vs Full Function MEDIA Menu
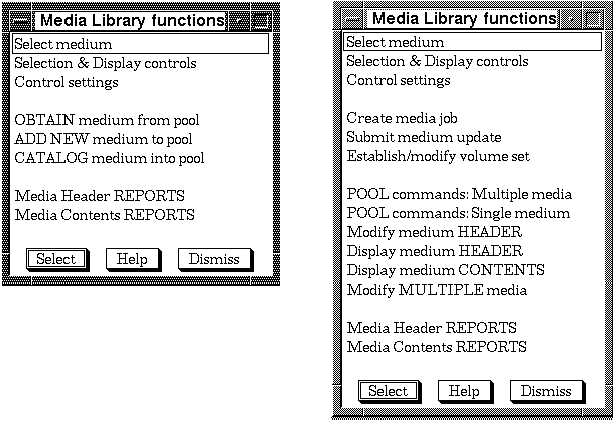
is displayed on the screen, depending on menu type selected.
7.1.1 The Simplified menu
The set of functions that can be performed in the simplified menu were
selected because they are essential to daily operations and because
they will satisfy the needs of many MEDIA users.
There are two approaches to working with media in the simplified menu.
These are:
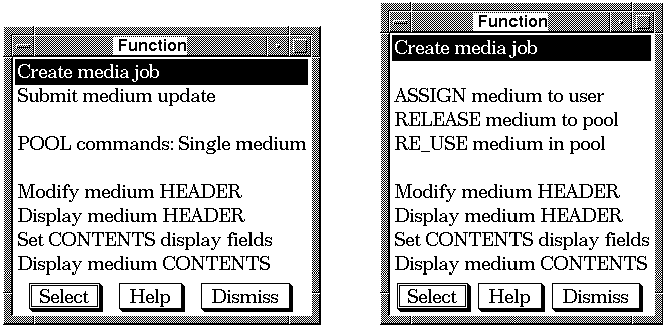
Figure 7-4 Full Function vs Simplified Function Menu
7.1.2 The Full function menu
After the full function Media Library menu appears,
the basic mode of operation requires that the user select a function to
be performed and provide name(s) for media to be processed. The menu
hierarchy is designed so that this can be done in two different ways:
Additional options offered on the top level menu allow the user to
establish various control settings (the first three menu selections)
and to work with the available REPORT options.
POOL command ... options allow the user to ADD or
CATALOG media into the Librarian data base, to ALLOCATE media for use,
to RELEASE media for other use, and to DELETE media from the Librarian
data base among other functions. Each of these functions is described
in detail in the succeeding subsections.
POOL commands: Multiple media
is available only on the full menu. The ... Multiple
media option is not included for the Function menu because a
single medium has already been selected.
POOL commands: Multiple media allows the user to
specify a list of media names then select a function to be completed
for all media in the list as a single operation.
7.2 MEDIA field data
The following figures and tables illustrate the forms encountered in
MEDIA and provide a description for each field on the form.
Refer to these tables when reading through the chapter if information
is needed on a field. Fields are listed in the same order as they
appear on the actual form.
Brief help is also available from each field by moving the cursor to
that field and pressing the Help key.
7.2.1 Physical description fields
Table 7-1 lists all fields displayed when a user chooses to either
modify or display a medium header and then chooses Physical
description fields from the subsequent menu:
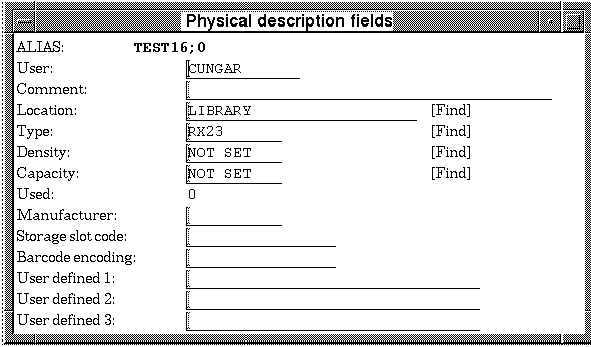
Table 7-1 Physical description fields
| Field |
Description |
|
Alias
|
This is the descriptive name which a user assigns to the medium and
uses to refer to it. The alias may be any alphanumeric combination of 1
to 21 characters.
|
|
User
|
This is the user name assigned to the medium. All entries in the
allocated pool are owned by a user. OPERATOR privilege required for
modification.
|
|
Comment
|
This is a text field into which any text data can be inserted.
|
|
Location
|
This is the rack or bin in which the tape will be stored. This is sent,
along with the external ID, to the OPERATOR whenever the medium needs
to be mounted on a drive.
|
|
Type
|
Specifies the base TYPE category for a medium. All TYPES are defined in
the parameter file. Only predefined values can be entered here.
|
|
Density
|
The recording density of the tape. The default will cause the system to
automatically toggle to the correct density setting during a mount or
update operation, if the density is not known.
|
|
Capacity
|
This is either the total length of a tape, in feet, or total disk
space, in megabytes.
|
|
Used
|
This is either the amount of tape used, in feet, or the amount of disk
space used, in megabytes. Read Only.
|
|
Manufacturer
|
This is the manufacturer of the medium. This field is optional and
purely for identification purposes.
|
|
Storage slot code
|
A text field that may be used with auxiliary robotic devices, to store
relevant data on a device slot. MANAGER or OPERATOR privilege required
for modification.
|
|
Barcode encoding
|
A text field that can be used for information related to a bar code
reader. MANAGER or OPERATOR privilege required for modification.
|
|
User defined 1
|
A text field that may be used for any relevant information regarding an
auxillary robotic device.
|
|
User defined 2
|
A text field that may be used for any relevant information regarding an
auxillary robotic device.
|
|
User defined 3
|
A text field that may be used for any relevant information regarding an
auxillary robotic device. MANAGER or OPERATOR privilege required for
modification.
|


