| Previous | Contents | Index |
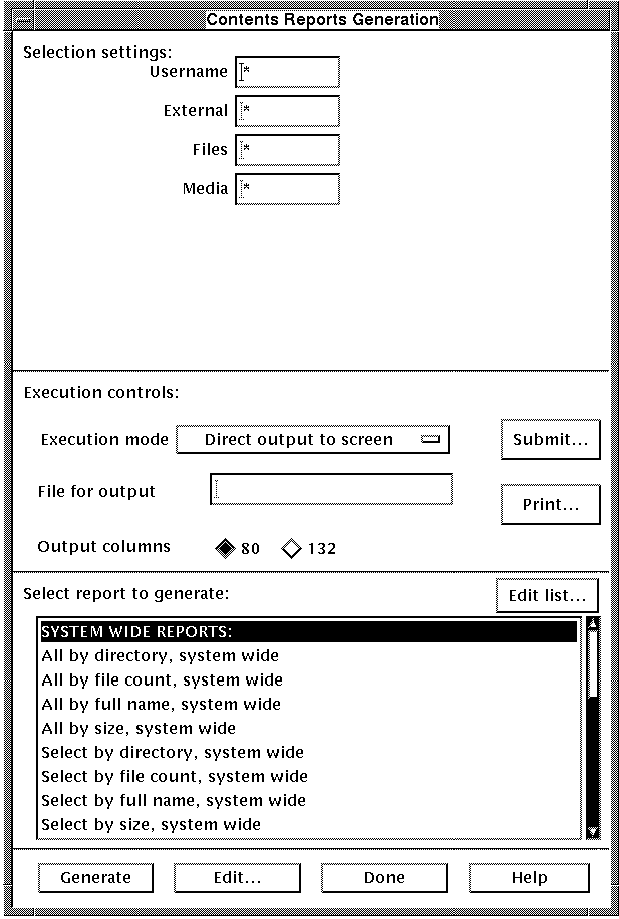
MEDIA contents reports are reports that provide information about the contents of media in the MEDIA database. The Contents reports... menu selection is used to produce a wide variety of contents reports that can be printed to a printer or file or output to the screen in a window. Reports can be customized to include certain data or produced using the default data.
In order to produce contents reports, select Contents reports... from the Utilities menu.

The top section of the dialog box is used to set the selection settings for the report. The data entered into each field in this form can be used as a selection filter to control which media are to be displayed in the reports. The fields may be filled in as follows:
| Field | Description |
|---|---|
| Username | The username associated with the media. |
| External | External id. of the media to be included in the report. |
| Files | Files to be included in the report. |
| Media | Media to be included in the report. |
The middle section of the dialog box are the Execution controls for the report. This is where you designate how the report is to be displayed or printed, how wide the report will be and the submit and print controls. The Execution mode may be selected from the drop down menu as described in Table 4-12.
The File for output is the file the report will be output to if the execution mode designates that the report is output to a file. The Output columns radio buttons are used to designate whether the report will have 80 or 132 columns.
The [Submit...] button allows the user to set the parameters used when submitting a report. The fields in the Submit parameters dialog box are explained in Table 4-13.
The [Print...] button allows the user to set the parameters used when printing a report. The fields in the Print parameters dialog box are explained in Table 4-1.
The bottom section of the dialog box is used to select the report to be submitted. The report list may also be edited by left-clicking on the [Edit list...] button.
The report definition may be edited by left-clicking on the
[Edit...] button. When all options are set correctly,
left-click on the [Generate] button to submit and output the
report.
4.6.6 Other reports...
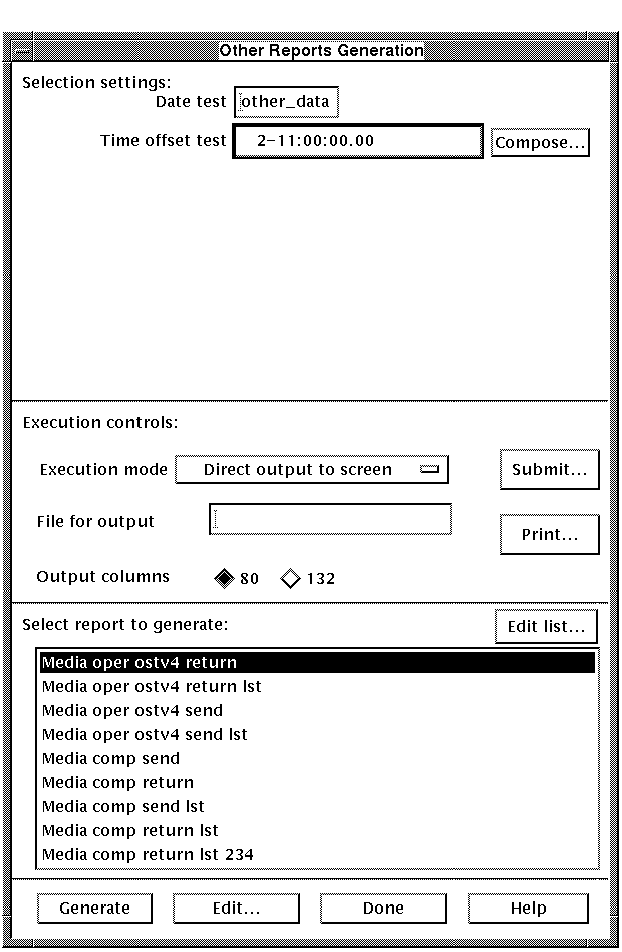
The Other reports... selection is used to create reports that have customized selection settings which were set up in the Other reports... section of the Control menu. See Section 4.3.5 for instructions on setting up these selection settings.
The middle section of the dialog box are the Execution controls for the report. This is where you designate how the report is to be displayed or printed, how wide the report will be and the submit and print controls. The Execution mode may be selected from the drop down menu as described in Table 4-12.

The File for output is the file the report will be output to. The execution mode designates whether the report is output to a file. The Output columns radio buttons are used to designate whether the report will have 80 or 132 columns.
The [Submit...] button allows the user to set the parameters used when submitting a report. The fields in the Submit parameters dialog box are explained in Table 4-13.
The [Print...] button allows the user to set the parameters used when printing a report. The fields in the Print parameters dialog box are explained in Table 4-1.
The bottom section of the dialog box is used to select the report to be submitted. The report list may also be edited by left-clicking on the [Edit list...] button.
The report definition may be edited by left-clicking on the [Edit...] button. When all options are set correctly, left-click on the [Generate] button to submit and output the report.
4.7 Help menu
The Help menu is used to get help about the
Media Manager software.

Help may be obtained in several ways throughout the program. These are:
The Help menu provides two types of help. The first
type is the help overview. This gives information on many aspects of
the program from MEDIA fundamentals to the MOTIF interface.
The other type of help is the description of menu items.
4.7.1 Overview...
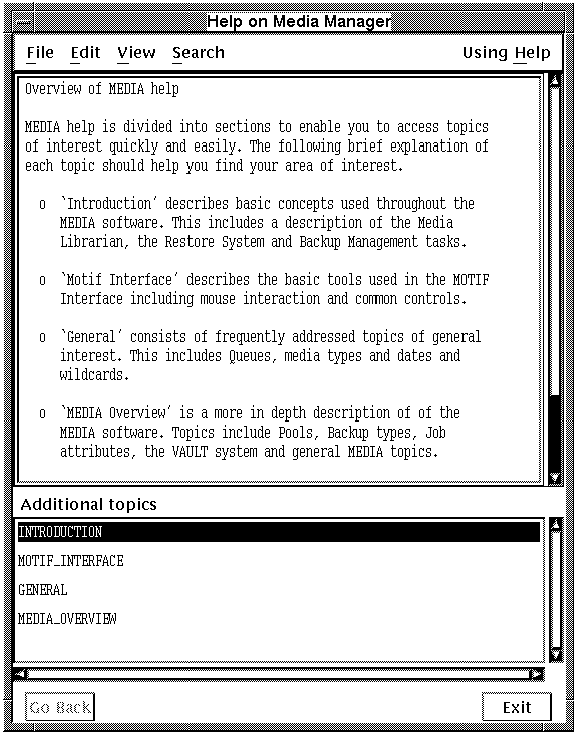
In order to get an overview of the program, select Overview... from the Help menu. The help module shown below will appear.
Figure 4-12 Help Overview

In order to get help on the menus throughout the program, select Top Menu... from the Help menu.
The basic approach to using BCKMGR is to create a new job (or select a pre-existing one), apply your desired options and submit it. As you will see, there are several other options including "Full disk recovery" and media assignment options, but job definition and submission are the principle functions.
Using BCKMGR, you can easily designate the media you are using for a backup, the job type, the number of media required and the priority of the job. You can set the submit options and the access controls. You can decide whether you want a record of your backup to be put in the VAULT database. Once you have all the settings defined for a job, it can be submitted at regular intervals, on a daily or weekly basis or any time span you designate.
One of the key attributes is the backup mode number. The backup mode controls how the backup operation is performed. Several predefined modes are provided with the system. Others can easily be added by the user as needed. Table Table 5-1 lists the various predefined mode numbers.
| Standard | Scratch | |||
|---|---|---|---|---|
| Backup Type | Incremental | Full | Incremental | Full |
| On-line | 2 | 3 | 4 | 5 |
| Appending | 13 | 14 | 15 | 16 |
| Remote VMS | 9 | 10 | 11 | 12 |
| Remote PC | 17 | 18 | 19 | 20 |
| Remote NFS | 21 | 22 | 23 | 24 |
| Agent NT | 25 | 25 | 25 | 25 |
| Agent UNIX | 26 | 26 | 26 | 26 |
| Backup Type | Incremental | Full | After Image Journal | |
| RDB | 6 | 7 | 8 | |
The backup types are summarized in the below list.
OPERATORS or MANAGERS handling backups who also have SCHEDULE7 installed on their system can perform more sophisticated and event dependent jobs. BCKMGR will automatically detect if SCHEDULE is installed on your system and utilize it's advanced scheduling capabilities in performing your backups.
1 Scratch processing is now available on both VAX and ALPHA platforms.2 DeviceShare is a trademark of Advanced Systems Concepts, Inc. Check with your MEDIA distributor for availability.3 LANutil is a trademark of Vector Networks Limited. Check with your MEDIA distributor for availability.4 TCPware from Process Software Corp.5 MultiNet from TGV Software Inc.6 TCP/IP Services from Digital Equipment Corp.7 The SCHEDULE automated backup system is available as a separate product. |
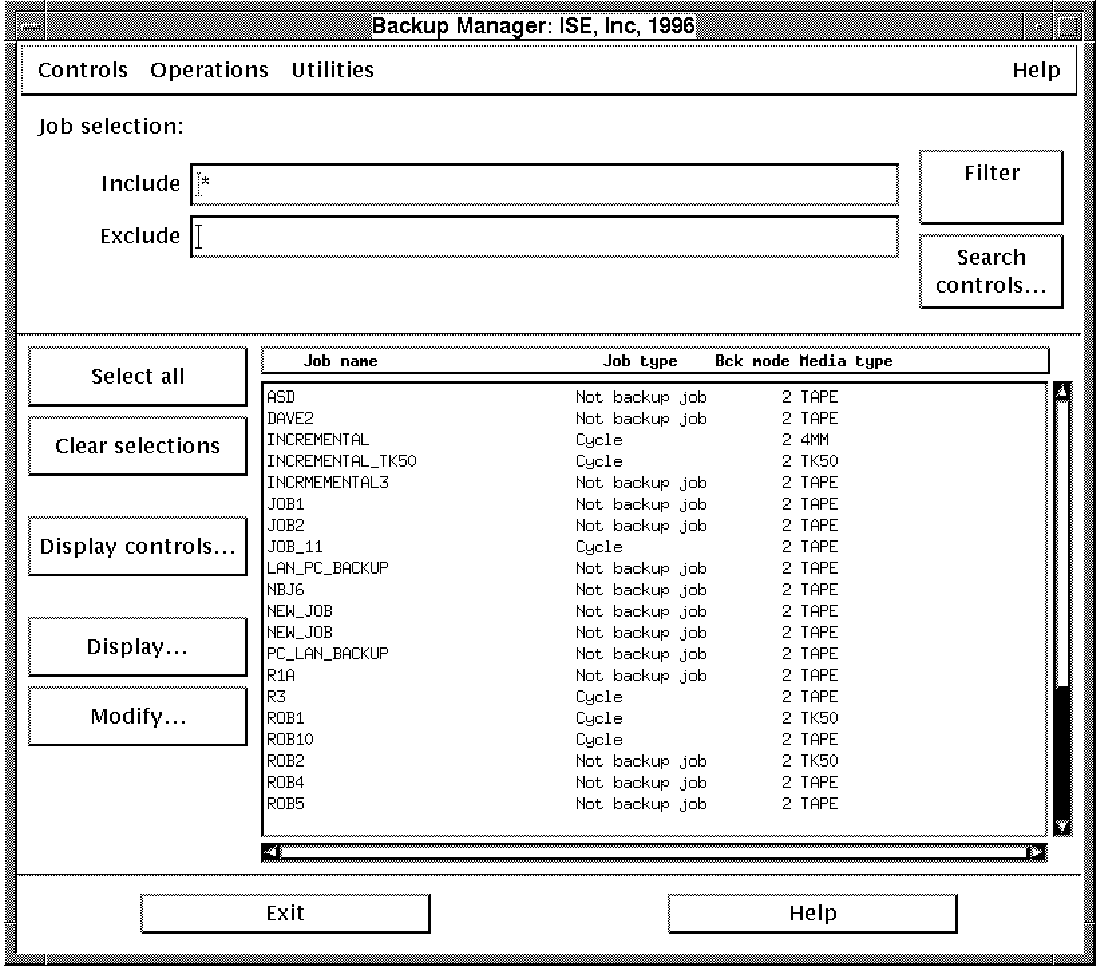
The BCKMGR interface is made up of the backup job selection fields, the job list and a number of controls for customizing and displaying the job list.

The procedure for performing backup job operations on one or more jobs are as follows:
Techniques for selecting more than one job are explained in Section 5.2.1. |
There are several methods for selecting which jobs are to be displayed in BCKMGR. This allows a user to limit the displayed jobs in the list according to criteria that makes sense for the situation. Perhaps you need to only select from the list of incremental jobs or full jobs.
The most obvious way to limit the list's scope is to designate Include or Exclude criteria from the Job selection section of the main screen. The resulting list would be limited to those jobs that were excluded (or included) by the job name entered in those fields.
As in all search criteria operations, the filtered list is not displayed until the Filter button is selected. |
Another way of selecting a limited list of jobs using other criteria is by selecting the Search controls... button on the main screen. A dialog box display will give the user the ability to limit the list by Job type, Backup mode, Media type etc.
The jobs you select from the job list will all be affected by the operation you perform. It is therefore important that you are sure all selected jobs are correct. The methods for selecting jobs are described in detail in the following sections.
| Previous | Next | Contents | Index |