| Previous | Contents | Index |
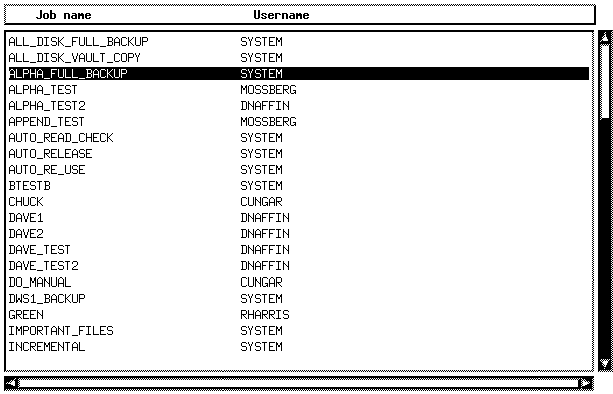
In order to select a single job, place the cursor over the desired job and click with the left mouse button. See Figure 5-1.
Figure 5-1 Select a single job
5.2.1.2 Selecting more than one job
You can select more than one specific job by using the
[Ctrl] and [Shift] keys.
In order to select multiple jobs that are not in adjacent rows in the list, depress the [Ctrl] key and click on the desired jobs with the left mouse button.
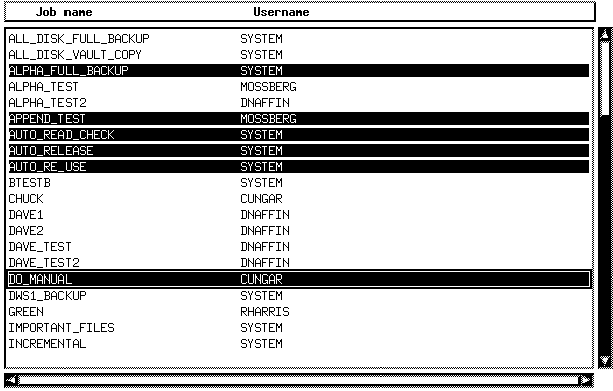
In order to select multiple jobs that are listed together in the job list, depress the [Shift] key and click on the first job in the series. Next, click on the last job in the series. All jobs between will be selected. See Figure 5-2.
Figure 5-2 Selecting multiple jobs
5.2.1.3 Selecting and deselecting all jobs
To select all jobs in the media list, click the [Select all]
button on the main window. All jobs in the list will be highlighted.
Individual lines can then be deselected using the method described in
Section 5.2.1.2.
To deselect all selected jobs, click the [Clear selections]
button on the main window. All highlighted jobs will be deselected.
5.2.2 Using the job selection fields
The job selection fields are used to limit the media displayed in the
media list to a certain user or name specification. For instance if you
only want to display jobs that start with SM, you would fill SM* into
the Include field.
The job selection criterion will not take effect until the [Filter] button is clicked. |
The Include field is used to designate what job name specification will be included in the list. Wildcard specifications are acceptable in this field.
The Exclude field is used to designate what job name
specification will be excluded from the list. Wildcard
specifications are acceptable in this field.
5.2.3 Using the Search controls
The [Search controls...] button allows you to use even more criteria to determine what jobs are displayed in the media list. In order to use the search controls, click on the [Search controls...] button. See Figure 5-3.
Figure 5-3 Search controls

The fields in the Search controls... dialog box all apply to an attribute of jobs in the job list. Available search controls are:
| Field | Description |
|---|---|
| Comment | Any text data that is in the comment field. |
| Job type |
One of four job types chosen from the following list:
|
| Backup Mode | One of the backup modes from Table 5-1. |
| Media type | Media type as assigned by MEDIA. |
After entering the desired inclusion criterion, click on the
[Filter] button to filter the job list according to the
selections.
5.3 Display controls...
A user may also wish to display more information about the jobs displayed in the display window. For instance, while Alias name and Username may be enough information for some users, others may need to see the Job type and Backup mode of the jobs in the list. There are a number of attributes of job data that can be displayed in the columns of the list.

The [Display controls...] are used to determine which job attributes are to be displayed in the columns of the media list. In order to display the Job Display Controls click on the [Display controls...] button on the main window.
The Job Selection Display Controls window will appear.
5.3.1 Common BCKMGR buttons
Some buttons that appear throughout the BCKMGR dialog boxes with some regularity are described in this section.
[Job list...] - Displays a recap of the jobs selected for a BCKMGR operation.
[Submit immediately...] - Submits the selected job immediately.
[View log...] - View the log file associated with the job submitted.
[Next] and [Prev] - Cycle through the media that are selected in the media list.
5.4 Menu operations
The menu bar is at the heart of BCKMGR controls, operations
and utilities operations. To select a menu command, click on the menu
name. Then click on the command you want. Some commands open dialog
boxes. Other menus simply perform the operation on the selected job. A
brief description of the menus follows:
The menus are described in detail in the following sections.
5.5 Controls menu
The Controls menu is used to set and save a variety of
controls that affect the operation of the BCKMGR program. The
options may be saved and will be in effect the next time the program is
invoked.

The Confirm/Log menu selection is used to determine whether certain operations require confirmation and/or are logged in a log file.
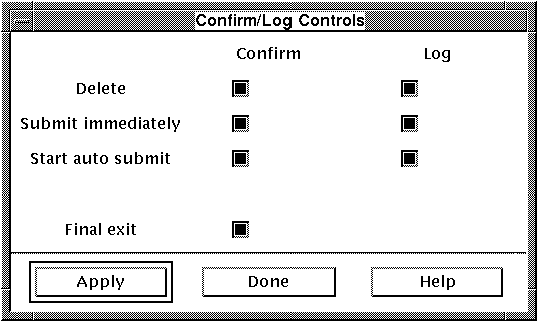
The operations that may be confirmed and/or logged are:
| Operation | Description |
|---|---|
| Delete | Confirm and/or log when a job is being deleted. |
| Submit immediately | Confirm and/or log when a job is being submitted for immediate execution. |
| Start auto submit | Confirm and/or log when Start auto submit is selected. |
The Selection lists... menu item is used to establish the lists that appear throughout the program when selection from a list is required. For instance several dialog boxes offer selections from a list of offsite locations. The defaults that appear in the list can be set using the Selection lists... menu. The figure illustrates an example of a selection list of available print queues.
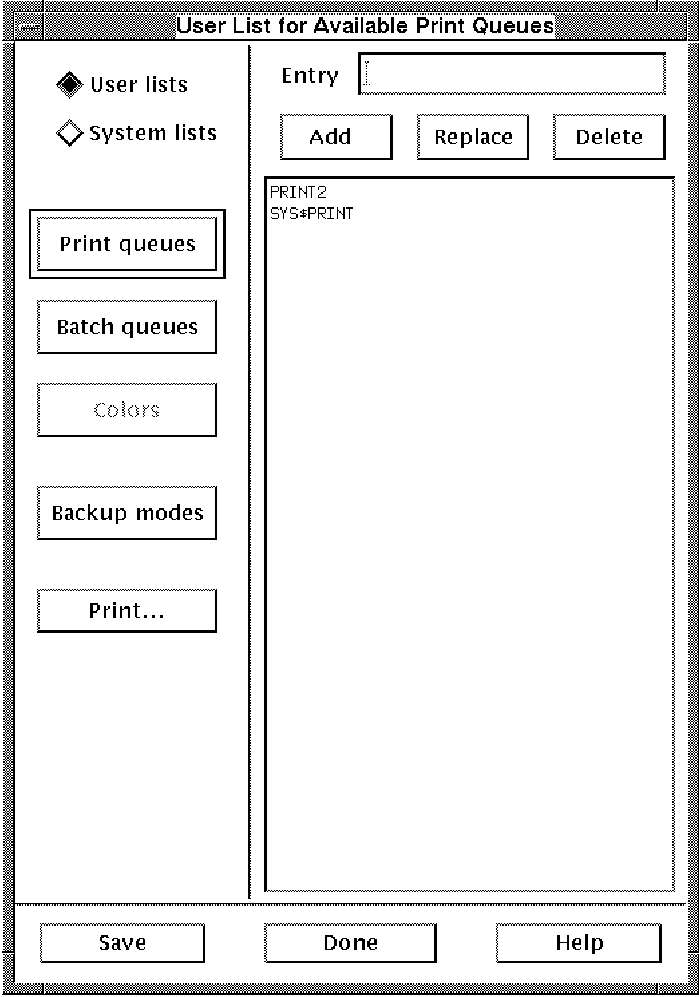
The procedure for adding to a selection list is to first enter the selection in the Entry field on the top of the dialog box. Left-click on a place in the list you would like the new selection to appear. If you want to add the selection into the list at this location, left-click the [Add] button. If you want the selection to replace the selection you have chosen, left-click the [Replace] button. If you want to simply delete the selection in the list, left-click the [Delete] button.
The selection lists that can be created are as follows:
| Data | Description |
|---|---|
| Print queues | Create the list that will appear whenever a print queue selection is needed. |
| Batch queues | Create the list that will appear whenever a Batch queue selection is needed. |
| Colors | Create the list of colors that will appear when adjusting the interface colors. |
| Backup modes | The list of backup modes that will appear when selecting a backup mode for a new job. |
If desired a list may be printed by selecting the [Print...]
button. Select the [Save] button to save the selections.
5.5.3 Print controls...
The default Print controls are set up by selecting Print controls... from the Controls menu. See Figure 4-7. The Print controls are described in Table 4-1.
Fill in the default Print controls and left-click the
[Apply] button to save the defaults.
5.5.4 Color controls...
The Color controls menu selection is used to change the colors DISPLAYed within the MOTIF Work Center . In order to change the form colors, select Color controls... from the Controls menu. Figure 4-8 will appear.
There are four aspects of the interface controls that may be changed. These are listed in Table 4-2.
The interface controls that can be changed are listed in Table 4-3.
Select [Apply] to see if the colors are acceptable. Select
[Reset] to reset to the colors you started with. Select
[Default] to bring up the default color schemes.
5.5.5 Other reports...
Using the Other reports... controls you can determine the selection settings that will appear when you select Other reports... from the Utilities menu. The Other reports... selection on the Controls menu allows you to set those selection settings.
In order to set up the selection settings, select Other reports from the Controls menu. The selections directly relate to the report definitions. For instance, if data in the report is referred to as "Log date", you would enter "Log date" in the Report prompt column.
The Form label column is used to designate the text
that will appear as the label to the field. The Button
type drop down list is used when a relevant
Compose... or Choice... button
applies to the selection. See Figure 4-9. The Form
label column is used to designate the text that will appear as
the label to the field. The Button type drop down list
is used when a relevant Compose... or
Choice... button applies to the selection.
5.5.6 Add menu item...
Any DCL command that can be executed from your environment can be added to the Operations menu by selecting Add menu item... from the Controls menu. See Figure 4-10
The dialog box allows the user to enter the desired menu text in the
left column and the corresponding DCL command in the right column. Some
examples are shown.
5.5.7 Set help key...
On some terminals, the user may desire to map an alternate help key if the default conflicts with a previously used key or key combination. To set this option select Set help key from the Controls menu. See Figure 4-11.
If the Standard radio button is selected, the keyboard will use the standard help key as dictated by the internals of the operating system.
To change the help key to a custom setting, select the
Custom radio button. Next, place the cursor in the
Enter help key field. Finally enter the key or key
combination that you will use to bring up help in the MOTIF Work
Center. The hex equivelent of that key will appear in the Key
symbol(hex) field.
5.5.8 Submit immediate controls...
The Submit immediately control allows the user to control how jobs are submitted when Submit immediately from the Controls menu. The form shown below will appear.
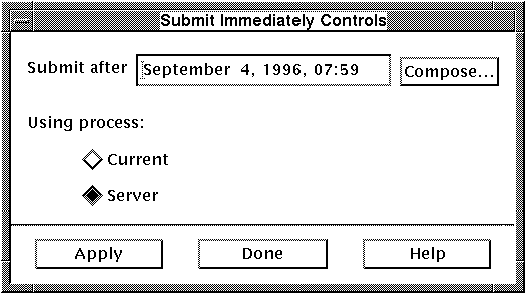
The Submit after field is the time that a job will be submitted if Submit Immediately is chosen from the Operations menu.
You may also select whether jobs are submitted in the
Current process or the Server process.
5.5.9 Save options...
To save the options that have been modified in the
Controls menu as well as any Display controls,
Media selection or Search controls settings
that have been modified, select Save options from the
Controls menu.
5.5.10 Reload options...
To reload the saved options if you have modified the
Controls menu or any Display controls, Media
selection or Search controls settings, select
Reload options from the Controls menu.
5.5.11 Media Manager...
In order to run the MEDIA module described in Chapter 4,
select Media Manager... from the
Controls menu.
5.5.12 Restore
Opens the submenu to the restore procedures, Restore via
VAULT, Restore entire disk and Retore
via search.
5.5.13 Exit
To exit the program and return to the command prompt, select Exit from the Controls menu. If there are other modules open focus will return to those modules.
5.6 Operations menu
All selections in the Operations menu perform the
selected operation on all jobs that are highlighted in the
jobs list window. Several of the dialog boxes utilize [Next]
and [Prev] buttons to cycle through all selected jobs. Other
selections simply apply the operation to a displayed list.
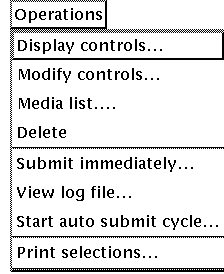
The Display controls... and Modify controls... menu selections are combined in this section because, while they perform different functions, their dialog boxes are identical. The only difference is that when displaying controls, you do not have the option of modifying the data (which you do in Modify controls...). These items may also be selected by choosing the [Display...] and [Modify...] buttons from the MOTIF Work Center main screen for BCKMGR. |
The Display controls... menu selection allows the user to review controls which are maintained about the jobs in the BCKMGR database. The dialog box which appears when the Display controls... menu item is selected is designed to display a wide variety of controls information.
The Modify controls... menu item can be used to modify these fields. After modifying the fields, select the [OK] button to complete the modification.
The top five buttons which appear along the left side of the dialog box determine what aspect of the MEDIA header data will be displayed on the right side of the dialog box. These will be explained in the following sections.
| Previous | Next | Contents | Index |