| Previous | Contents | Index |
After creating a list of media, the next step is to create a template record for the media in the list. The template is, in effect a `dummy record' that the media in the list will be based on. The characteristics of the template record can later be copied, either completely or partially to the list of media.
In order to add a new template record, select Add new template record from the Modify MULTIPLE media menu. A dialog box will appear requesting the External ID of the template record.

Following the dialog box, a menu of available media types will appear. This will be the type of the template record. Some choices are listed in the figure below.
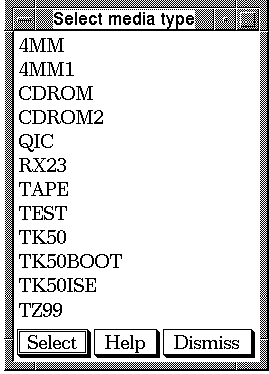
If the desired type is not listed, ask your MANAGER to add it to the list.
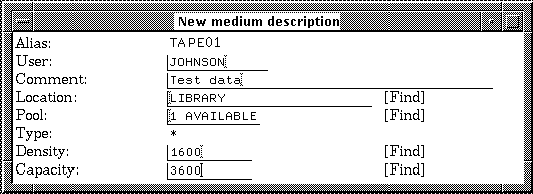
At this point, the user will be presented with a form requesting further information on the template record. The system defaults are displayed, but may be edited for the template.
7.11.2 Enter template record name
This option is used to enter the External ID of a previously added
template record. This allows the user to have several template records
available for future use. In order to enter a template record, select
Enter template record name from the Modify
MULTIPLE media menu. A dialog box will appear requesting the
External ID of the template record.
7.11.3 Review/edit template record fields
In order to review and/or edit the record fields that are associated with the template record, select Review/edit template record fields from the Modify MULTIPLE media menu. The menu shown below appears on the screen.

The choices in the Select record area menu provide a
variety of forms. See section Section 7.2 for a description of fields
used to modify the Media database. See sections Section 7.3.5.1 through
Section 7.3.5.5 for information on modifying the record fields.
7.11.4 Select Physical data fields
This option allows the user to choose the physical data fields that will be copied from the template record to the list of media. This allows the user to modify only select fields and leave the remaining fields intact. In order to select the physical data fields, choose Select Physical data fields from the Modify MULTIPLE media menu. The form shown below will appear. See Section 7.2 at beginning of chapter for a description of fields.

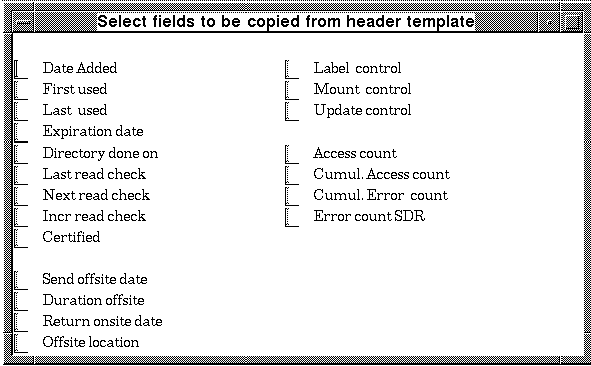
This option allows the user to choose the Dates, Flags & Counts that will be copied from the template record to the list of media. In order to select the physical data fields, choose Select Dates, Flags & Counts from the Modify MULTIPLE media menu. The form shown below will appear.
7.11.6 MODIFY selected header fields
After selecting the fields that will be modified, this option will
execute the modifications. In order to modify the selected header
fields, select MODIFY selected header fields from the
Modify MULTIPLE media menu. Only the selected header
fields will be modified, by copying the information from the respective
template fields.
7.11.7 MODIFY all header fields
In order to modify all the header fields, select MODIFY all header fields from the Modify MULTIPLE media menu. Most of the fields in the master template will be copied from the template into each of the media records on the list. Exceptions or fields which cannot be changed by this function are: Username, Owner, External ID, Alias name, Version number, Pool assignment, Shadow tape name, ACL and Volume set values, and the internal states function map.
7.12 Obtain medium from pool(Simplified menus)
Selection of this menu item allows the user to obtain a medium from the
available pool for use. The Media Librarian will display a form
requesting desired medium type, location, density, and length.
In order to allocate a single medium, choose Obtain medium from pool from the Media Library functions menu. The Obtain new medium form will appear (see figure below).
Figure 7-16 Obtain new medium form

The user may accept the default values, fill in the fields with the media data, or press the [Find] key with the cursor in the particular field.
7.13 ADD NEW medium to pool(Simplified menus)
Selection of this menu item will enable the user to add a new medium to
the available or allocated pool. Typically, the manager would add the
medium to the available pool with a user name "SYSTEM". This indicates
that the medium is not designated for a specific user and may be
allocated.
The MANAGER can also add media to the allocated pool by designating a specific user name. If the USER_ADD parameter has been disabled by the configuration, then the general user level will be unable to add new media to the data base.
In order to add media, choose ADD NEW medium to pool from the Media Library functions menu.
A dialog box will appear requesting the External ID of the new medium. See the figure below.

Following the dialog box, a menu of available media types will appear. Some typical choices are listed in the following figure.

If the type desired is not listed, see the MANAGER to add it to the list.
At this point, the user will be presented with a form requesting further information on the medium. The system defaults are displayed, but may be edited for the particular medium.

7.14 Catalog medium into pool(Simplified menus)
Selection of this menu item enables the user to enter an existing
medium (usually already containing data) into the media data base for
use under Media Librarian capabilities. The user is prompted for the
External Identifier and other information about the incoming medium. If
the USER_ADD parameter has been disabled by configuration control, then
the General User level will be unable to use this command.
In order to catalog incoming media in MCL, choose CATALOG medium into pool from the Media POOL Commands menu. A dialog box will appear, requesting the user enter the identifier of the medium being cataloged.

Following the dialog box, the Catalog new medium form will appear.

For a description of all fields to be input in the form, see Table 7-5.
7.15 Media Header REPORTS
There are two basic types of MEDIA reports: reports about the
media(MEDIA) and reports about the contents of media(MEDIAF). The
method for producing reports for each of these basic types of data is
virtually identical. In each case, the first menu to appear has the
list of currently eligible reports as menu items, followed by a
Control settings menu item. The controls for both
database data and contents data are identical, except for the data
filters, which are specific to that type of data.
It should be noted that HELP can be accessed at any time during an MCL session by pressing the HELP key. To produce reports about the database, select Media Header REPORTS from the Media Library functions menu.
The form shown below, Create a MEDIA Report Menu appears on the screen.
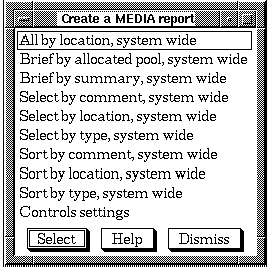
Selecting any menu item from the first menu item to the Control settings menu item will produce a report. Reports can be added or removed from this menu by user selections within the Control settings menu item.
For information on the creation of reports in DCL, see
<REFERENCE>(date_rep), "Database reporting".
7.15.1 Sample report
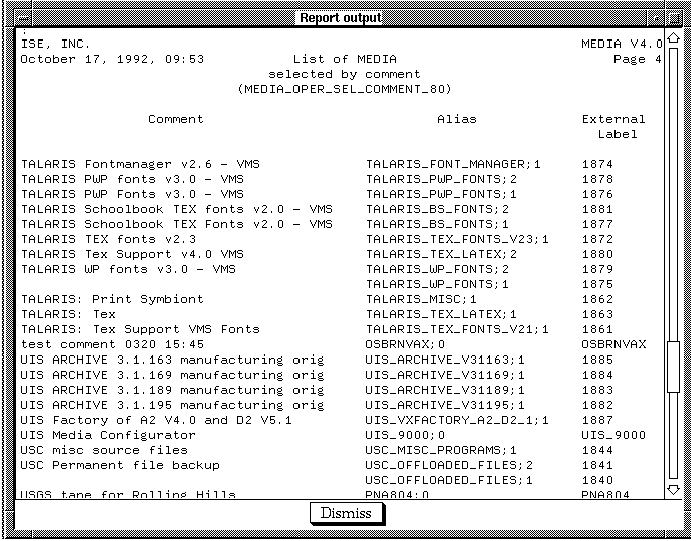
To produce a report about the database, select the desired report from the Create a MEDIA Report menu. If the Execute mode is set to "output to the screen", then a sample report display appears on the screen. Three sample reports are described and listed below.
Figure 7-17 displays a report of all media by location, system wide. Figure 7-18 displays a report of all media by type, system wide. Figure 7-19 displays a report of all media by comment, system wide. Otherwise, for any other Execute mode, an output equivalent to this display is sent either to a file or directly to a printer. The Execute mode is set by user input within the Control settings menu item.
Figure 7-17 Sample Report Display: All by location, system wide
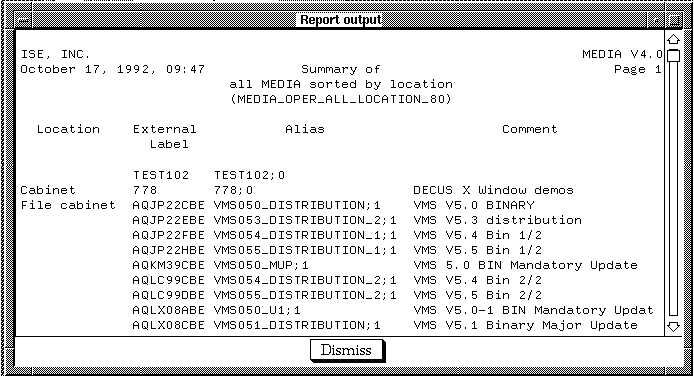
Figure 7-18 Sample Report Display: All by type, system wide

Figure 7-19 Sample Report Display: Select by comment, system wide
7.15.2 Control settings
To control the selection of data to be reported and parameters related
to producing the report, select Control settings from
the Create a MEDIA Report menu. The form shown below
appears on the screen.
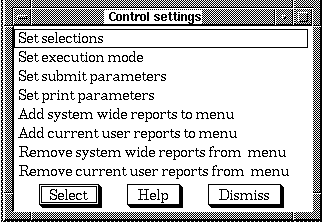
To control the selection of data to be reported, select Set selections from the Control Settings menu. The form shown below appears on the screen.

The data entered into each field in this form can be used as a
selection filter to control which media are displayed in the reports.
Each report can be set up to use any, all or none of these selection
filters.
7.15.2.2 Set execution mode
To control the output of the report, select Set execution mode from the Control Settings menu. The form shown below appears on the screen.

To choose between 80 column and 132 column reports, either set or clear the 80 (vs 132) columns flag. The 132 column reports contain more columns of data and, in some cases, more characters for specific data fields than the 80 column reports.
To modify the execute mode, move the cursor to the Execute mode field and press FIND. The following figure appears on the screen.

You may choose to submit to batch or to execute immediately. The report can be output to a specific file, spooled to the printer or displayed directly on the screen. Upon selecting one of the five execute modes, the menu is automatically exited and the description of the execute mode is put into this field.
To set the default name for the output file, enter the file name into
the File for output field.
7.15.2.3 Set submit parameters
To set the submit parameters for the reports, select Set submit parameters from the Control Settings menu.
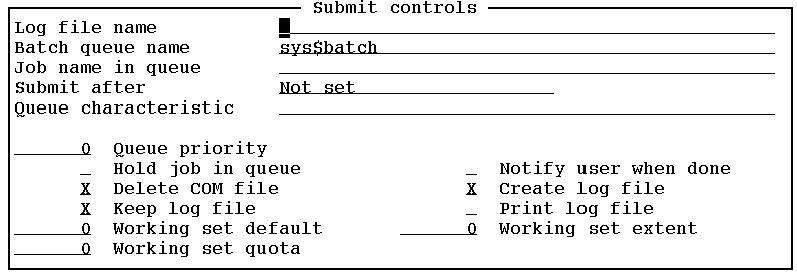
All of the data set in this form only relates to generating a batch job to produce a report. This data does not affect the MEDIA database. These fields perform the following functions:
These parameters should not be of consequence to general usage of the Report software but are provided here for completeness. For additional information on these parameters, see VMS System Management, Volume 1A. |
To set the print parameters for the reports, select Set print parameters from the Control Settings menu.

All of the data set in this form only relates to generating a batch job to print out a report. This data does not affect the MEDIA database.
These fields perform the following functions:
| Previous | Next | Contents | Index |