| Previous | Contents | Index |
To set the language used in displaying text for menus and forms, select Set display language from the Controls menu. The Language Selection Menu appears on the screen.

When a user selects a language, the menu is automatically exited.
10.4.7.6 Set keyboard language
To set the language used to map each text key on the keyboard to a text symbol, select Set keyboard language from the Controls menu. The Language Selection Menu appears on the screen.
Some languages (like English and Dutch) only map one or two keys (upper case comma to period, upper case period to front slash). Other languages require a more extensive keyboard mapping, as shown in Digital's documentation for the respective languages.
When a user selects a language, the menu is automatically exited.
10.4.7.7 Set keyboard mode
To set the keyboard mode between typewriter and data processing, select Set keyboard mode from the Controls menu. The Keyboard Mode Menu appears on the screen.

For some keyboard languages the choice of keyboard mode will map a few of the punctuation keys differently. With English as the keyboard language there are no differences, but for most of the other languages there are a limited number of differences.
When a user selects a keyboard mode, the menu is automatically exited.
10.4.7.8 Set window colors (Workstations only)
To set the window colors, select Set window colors from the Controls menu. The Window Colors Menu appears on the screen.
Figure 10-8 Window Colors Menu
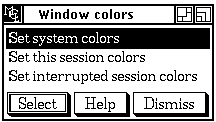
There are three groups of window colors from which to choose. First, the Set system colors menu item will set colors for all new sessions created after this point in time. Second, the Set this session colors menu item will set colors for the new session that will be created if you select Start a new session from the Interrupt Menu. Third, the Set interrupted session colors menu item will set colors for the session that was just interrupted.
When a user selects one of the three groups of window colors, the Colors Settings Display and Color Types Menu appears on the screen.
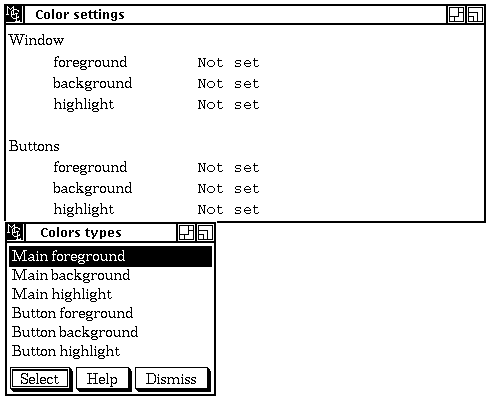
Each menu, form, and display is composed of a main window area and, except for forms, one to three buttons at the bottom of the main window area. There are three color controls each for the main window and the buttons: the foreground color, the background color, and the highlight color. When a user selects one of the six color types, the Colors Menu appears on the screen.
Figure 10-9 Colors Menu
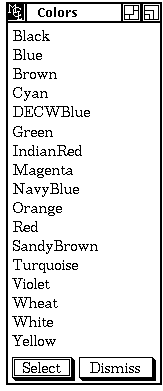
When a user selects one of the colors, the menu is automatically exited
and, after a couple of seconds, the Color Settings Display is updated
to reflect the color choice. The new color will be used for the next
menu, form, or display that appears on the screen.
10.4.7.9 Set fonts (Workstations only)
To set the font size and color, select Set fonts from the Controls menu. The Font Data Settings Display and Font Data Menu appears on the screen.
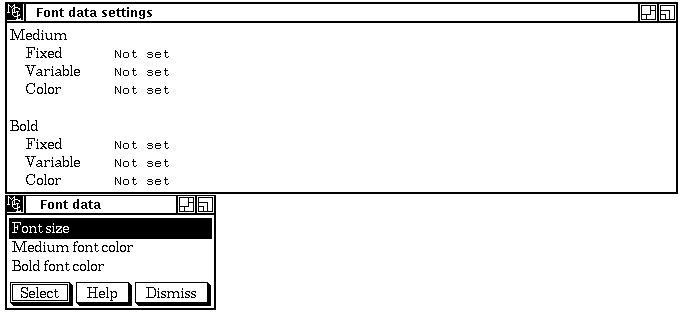
To set the font size, select Font size from the Font Data menu. The Font Size Menu appears on the screen.
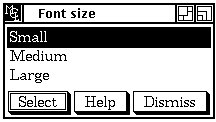
When a user selects one of the font sizes, the menu is automatically
exited and, after a couple of seconds, The Font Data Settings Display
is updated to reflect the font size choice. The new font size will be
used for the next menu, form, or display that appears on the screen.
10.4.7.9.2 Font color
To set the medium or bold font color, select Medium font color or Bold font color from the Font Data menu. The Font Color Menu appears on the screen.

When a user selects one of the colors, the menu is automatically exited
and, after a couple of seconds, The Font Data Settings Display is
updated to reflect the font color choice. The new font color will be
used for the next menu, form, or display that appears on the screen.
10.4.7.10 Change privileges
To change the current process privileges, select Change privileges from the Controls menu. The Process Privileges Form appears on the screen.
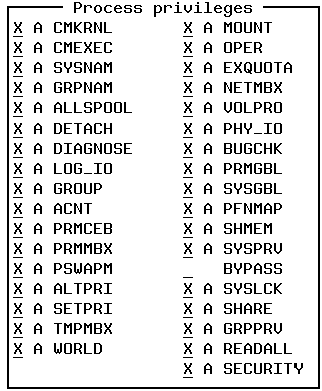
You must have sufficient system privilege to have these changes take
effect.
10.4.8 Obtain HELP
To obtain HELP on a certain topic or application, select Obtain HELP from the Interrupt Menu. The HELP Display and Menu appears on the screen.
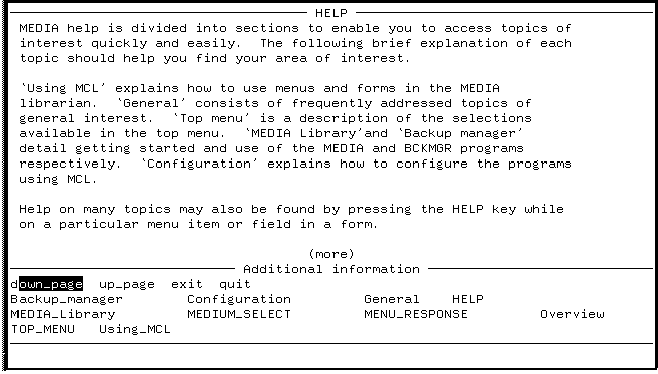
The top part of the screen image is the display of a page of text on the selected topic. The bottom part of the screen image is the menu of topics that can be selected.
HELP is designed to let you request general information on an application and quickly narrow the focus of your inquiry. In HELP you can:
To get HELP on an item in a menu or on a field in a form, move the
cursor to that item or field and then press the HELP key. A brief
display of information appears on the screen.
10.4.9 Quit
To exit from MCL and return to DCL operations, select Quit from the Interrupt Menu. You will exit MCL and return to the DCL prompt.
This chapter familiarizes the user with the variety of uses for
MEDIA from the DCL command line and the format and conventions
used in this manual.
11.1 MEDIA command syntax
The format of each MEDIA command is:
$ MEDIA MEDIUM_NAME MEDIA_COMMAND/QUALIFIERS. |
Each MEDIA command is preceded by the keyword MEDIA immediately after the DCL (the $ symbol) prompt and is followed by:
For example:
$ MEDIA * DIRECTORY |
In this example, the DCL prompt is followed by the keyword MEDIA, the VMS wildcard * (to indicate all medium names are to be acted on), and the MEDIA command DIRECTORY.
$ MEDIA MYTAPE ADD/TYPE=TAPE/DENSITY=1600 |
This example specifies the medium MYTAPE, followed by the command ADD with qualifiers indicating the TYPE of medium being added and the DENSITY of the medium.
The MEDIA command default is DIRECTORY. If no command is entered in after MEDIA,, MEDIA responds as if you had typed:
$ MEDIA * DIRECTORY |
If no medium is specified, the DIRECTORY command acts as though the
medium was specified as the VMS wildcard * and displays all
the media allocated to the user as a list of aliases.
11.2 Using MEDIA database commands
This section describes the most commonly used MEDIA database
commands.
11.2.1 Allocating and naming a medium for private use
To obtain a medium for your own private use you would use the special selection qualifier /NEW in a MEDIA command.
For example, to acquire a medium enter the command
$ MEDIA MY_SPECIAL_TAPE/NEW SET/COMMENT="Test data tape" |
When allocating a medium, you can use qualifiers to select certain types of media. If you do not specify any qualifiers, the defaults are used.
The selection qualifiers are listed in Table 11-1.
| Qualifier | Description |
|---|---|
| /DENSITY=number | selects tapes with the indicated density. The density can be 800, 1600, 3200, 6250, 6666, 10000, 39782 or 79564 bpi (bits per inch). |
| /LENGTH=number | selects tapes with the indicated length. |
| /LOCATION=string | selects a medium with the specified location string. The location can be any string that has been entered into the MEDIA database. The default location is ANY LOCATION. |
| /TYPE=word | selects a medium of the type indicated. The type can be any device type that has been defined to the parameter file. Check with the MANAGER for specifics. |
The special medium name UNKNOWN can be used in place of the special qualifier /NEW to obtain a medium from the available pool. You can also use the qualifier /REPEAT to allocate more than one tape to you at a time. /REPEAT simply repeats the allocate operation the specified number of times.
For example, to allocate 3 tapes of 2400 feet and 6250 bpi from the available pool, enter the following:
$ MEDIA UNKNOWN/TYPE=TAPE/LENGTH=2400/DENSITY=6250/REPEAT=3 |
Having assigned a medium to your use, you can now leave the medium name
the same as the external ID or you can give the medium an alias name by
using the RENAME_TO command.
11.2.2 Putting data on a medium
To move files between the on-line storage and off-line storage, the following format is used:
To write all *.FOR tapes to tape MY_SPECIAL_TAPE:
$ MEDIA/NOWRITE MY_SPECIAL_TAPE $COPY *.FOR MEDIA:*.* Tape job 23, medium MY_SPECIAL_TAPE;1 (1234) entered on queue SYS$TAPE |
To read ABC.FOR from tape MY_SPECIAL_TAPE:
$ MEDIA MY_SPECIAL_TAPE $COPY MEDIA:ABC.FOR */LOG Tape job 24, medium MY_SPECIAL_TAPE;1 (1234) entered on queue SYS$TAPE |
To erase and add new files to tape 1234:
$ MEDIA/INITIALIZE MY_SPECIAL_TAPE $COPY *.* MEDIA: Tape job 25, medium MY_SPECIAL_TAPE;1 (1234) entered on queue SYS$TAPE |
11.2.3 Displaying information about files or media
The MEDIA database keeps two kinds of information: header
information about the physical attributes of the medium itself and
contents information about the files on the off-line media. Either type
of information can be displayed in a variety of ways about media that
are allocated to you, using the command DIRECTORY. The format of the
command depends on the information you want to display.
To display header information about media:
$ MEDIA MEDIUM_NAME DIRECTORY |
To display information about the contents of a medium, you must include a right angle bracket > and a file specification: 1
$ MEDIA MEDIUM_NAME>FILE_NAME DIRECTORY |
The command DIRECTORY is the default MEDIA command and so, if
no command is specified, the system does a directory operation. If no
medium name is included, the wildcard * is assumed.
11.2.4 Displaying header information
The header information file displays a list of all the media allocated to you. For example,
$ MEDIA * DIRECTORY |
displays this list:
Directory of JOHNSON media on 20-JAN-1996 15:23 2012;0 2072;0 3001;0 3115;0 3245;0 3550;0 SALES_APR;4 SALES_AUG;4 SALES_DEC;5 SALES_FEB;4 SALES_JAN;5 SALES_JUL;4 SALES_JUN;4 SALES_MAR;4 SALES_MAY;4 SALES_NOV;5 SALES_OCT;5 SALES_SEP;5 TAX_Q1;4 TAX_Q2;3 TAX_Q3;3 TAX_Q4;4 Total of 22 media |
Each of the 22 entries above represent a separate tape or disk owned by the user "JOHNSON", under whose username the command was typed in. The media listed by serial number with a version number ";0" have not had an alias established.
To display your media by the external ID, include the version number ";0":
$ MEDIA *;0 DIRECTORY Directory of MEDIAS media on 20-JAN-1996 15:24 0023;0 0024;0 0123;0 1012;0 1051;0 2001;0 2010;0 2011;0 2012;0 2050;0 2072;0 2200;0 3001;0 3115;0 3220;0 3245;0 3541;0 3550;0 4511;0 4728;0 T17;0 T21;0 Total of 22 media |
Each of the 22 entries above shows the external ID of a tape or disk. The media may or may not have an alias associated with them.
There are many varieties of line displays. By specifying a series of qualifiers, it is possible to pick out a selection of columns. For a complete list of the available columns, please refer to the later section which details the directory command.
Several examples are listed below:
MEDIA * DIRECTORY Directory of JOHNSON media on 13-MAR-1996 09:50 1200;0 1201;0 1203;0 1213;0 1220;0 1274;0 1277;0 1292;0 1294;0 1303;0 1309;0 1316;0 1341;0 1342;0 VAXVMSRL1;0 VDATA;4 VDATA;3 VDATA;2 Total of 18 media |
MEDIA * DIRECTORY/COMMENT Directory of JOHNSON media on 13-MAR-1996 09:50 1200;0 Source backup 1201;0 1996 San Diego DECUS tape 1203;0 Master listings 1213;0 Misc. FORTRAN source routines 1220;0 9/16/91 Backup everything 1274;0 KIRMET - Virtual terminal routines 1277;0 1996 Spring DECUS tape 1341;0 1996 Fall DECUS tape 1342;0 Assorted games 1347;0 DEC SSP Source 1387;0 Permanent storage of system programs VAXVMSRL1;0 VMS V3.6 last version used Total of 12 medium |
MEDIA * DIRECTORY/DATE/SIZE/DENSITY Directory of JOHNSON media on 13-MAR-1996 09:50 1200;0 5-FEB-1996 17:53 85% (2055/2400) 1600 1201;0 27-JUL-1996 13:18 36% (881/2400) 800 1292;0 15-MAR-1996 14:20 2400 0 1309;0 19-JUL-1996 12:20 49% (1181/2400) 1600 1316;0 7-MAY-1996 13:37 2400 0 1342;0 13-FEB-1996 17:14 2400 0 1347;0 6-APR-1996 14:58 28% (676/2400) 1600 1381;0 23-OCT-1996 21:06 27% (665/2400) 1600 1396;0 13-FEB-1996 17:06 0% (5/2400) 1600 VAXVMSRL1;0 (not set) 89% (156/174M) 0 Total of 10 medium |
1 The file name can contain a directory specification, but this is only relevant to directory structured media like BACKUP tapes and FILES11 disks. |
| Previous | Next | Contents | Index |