| Previous | Contents | Index |
In addition to backup sources other actions can also be invoked. To cause a DCL command procedure to be invoked after the first disk is done set the parameter as follows:
parameter(2) = "@SYS$UTIL:SPECIAL_FUNCTION" |
To just issue one DCL command (it is issued in-line instead of as a subprocedure) the plus operator can be used. To add an operator message after disk one set the parameter as follows:
parameter(2) = "+REQUEST LOAD-SPECIAL-TAPES" |
One common use of this feature to instruct the system to send off-site the media that was just used. To send the media offsite today and then return them in 45 days set the first three parameters as follows:
parameter(1) = "+BCK_OFFSITE := 1" parameter(2) = "+BCK_SEND_ON := TODAY" parameter(3) = "+BCK_DURATION := 45" |
In case the maximum of 30 characters that is allowed in parameter is not enough then you can continue onto the next line by using the minus sign. The below example illustrates this:
parameter(1) = "DISK$ISE0:[SYS0.VMSCOMMON.SYSLIB]" paraemter(2) = "-STARLET.OLB" |
Comments can be placed on a parameter by placing a "!" in column 1. For example, to make line 1 a comment do the following.
parameter(1) = "! Special disks are listed below" paraemter(2) = "DISK$DUA1:" |
To automate the starting of your backup jobs use either SCHEDULE7 or the BCKMGR_AUTO_SUBMIT.COM procedure.
SCHEDULE provides the most flexibility in selecting when and under what circumstances to run your backup. It can also interconnect this job with other jobs in a job stream. SCHEDULE provides three different rescheduling methods, interval, named day and marked calendar all them can take into account exceptions like holidays.
The easiest way of creating this job is either select "Start auto submit cycle" from the menu or invoke the procedure BCKMGR_CREATE_SCHEDULE.COM. Additional notes on this procedure are include at the beginning of the procedure itself. Just type it out for more information.
WITHOUT SCHEDULE the VMS batch facility can be used to implement an interval rescheduling method. In this case the interval between jobs is stored in PARAMETER(30) of the job. The easiest way of creating this type of job is to either select "Start auto submit cycle" from the menu or invoke the procedure BCKMGR_AUTO_SUBMIT.COM. Additional notes on this procedure are include at the beginning of the procedure itself. Just type it out for more information.
7 SCHEDULE is available from your MEDIA distributor. Any other job scheduling products can also be used with MEDIA. |
All other job attributes can be viewed using the below DCL command. This same information is also accessible via the menu system.
$ BCKMGR DIR/FULL ONLINE_BACKUP


TESTBCK
    Comment                   = Full backup of DWS$DKA300 and DWS$DKA400
    Username                  = SYSTEM
    Last submit               = June  11, 1995, 08:33
    Last completed            = June  11, 1995, 02:02
    Job Log                   =
    Priority                  = 0
    Flags                     = Media_Job,Gen,Keep,NoPrint,NoRestart
    Status                    = %x00000001
    P1                        =
    Backup mode               = 3
    Next media                = TAPE002
    Generations               = 4
    Required                  = 1
    Media type                = TAPE
    Up count                  = 34
    Down count                = infinite
    Owner                     = [SYSTEM]
    Protection                = S:RWED,O:RWED,G,W
    Parameter
       (1)  = "DWS$DKA300:"
       (2)  = "DWS$DKA400:"
|
The key attributes that control how a backup works are:
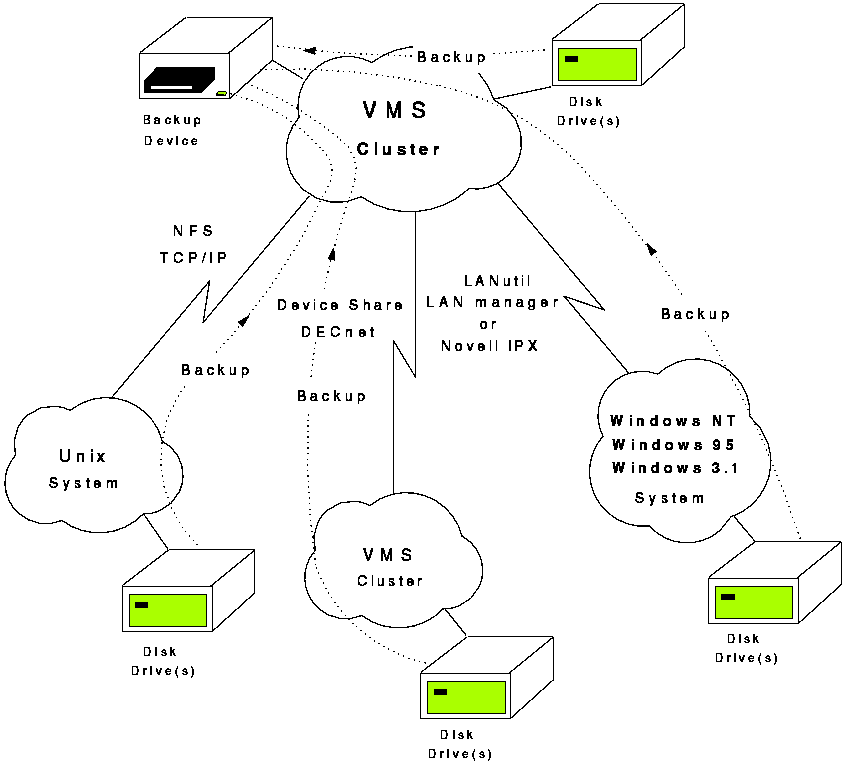
Figure 2-2 illustrates the dynamic backup capabilities of centralized backups using BCKMGR. Using VMS as a central server with remote UNIX, VMS and PC nodes backups may be performed of all remote and local nodes to a central backup device.
Figure 2-2 Centralized Backup

Remote NFS backups allows the backup job to connect to a remote UNIX, WindowsNT or OpenVMS NFS server and backup the disk drives in that server. These modes automatically connect/disconnect while performing the backup.
Remote NFS backups use any of the available TCP/IP for OpenVMS packages. The packages that have been tested are TCPware1, MultiNet2 and TCP/IP Services (or UCX)3.
Remote VMS backups use the DeviceShare4 utility. It allows a remote OpenVMS system to serve it's local disk drives out to other OpenVMS systems and be backed up.
Remote PC backups use the LANUtil5 system. It allows your OpenVMS system to backup the hard drives in any PC on your LAN (Novell, Pathworks, or LANmanager). This utility also provides several other useful management features to assist in managing PC.
1 TCPware from Process Software Corp.2 MultiNet from TGV Software Inc.3 TCP/IP Services from Digital Equipment Corp.4 DeviceShare is a trademark of Advanced Systems Concepts, Inc. Check with your MEDIA distributor for availability.5 LANutil is a trademark of Vector Networks Limited. Check with your MEDIA distributor for availability. |
2.8 Centrally managed - Remotely controlled backups
Figure 2-3 illustrates the layout of a central VMS cluster with separate UNIX, VMS and PC agents that utilize their own backup devices. BCKMGR controls the backups to these remote devices using the central agent method.
Figure 2-3 Centrally managed - Remotely controlled backups

Centrally managed NT backups determine what media to use and then initiate a backup job on the remote NT system. This job would backup disk drives in the NT system to a tape drive attached to the NT system. Once the remote job completes usage information is collected and integrated back into the BCKMGR database.
Centrally managed UNIX backups determine what media to use and then
initiate a backup job on the remote UNIX system. This job would backup
disk drives in the UNIX system to a tape drive attached to the UNIX
system. Once the remote job completes usage information is collected
and integrated back into the BCKMGR database.
2.9 Overview of VAULT
VAULT is a program designed to allow users to find and restore files that have been copied onto off-line storage by VMS BACKUP. There are many reasons you might need to restore a file:
VAULT lets you restore any file you own from off-line storage
with a single command. You are no longer forced to wait for a MANAGER
or OPERATOR to process your request to locate and restore the file.
2.9.1 Backups
A backup is a copy of a file to off-line storage. Backups are important because they allow you to retrieve previous generations of a file even if it has been modified, damaged or deleted from your on-line directory. Because of the critical nature of many files, you need to copy the files to tape fairly often to:
Without a program like VAULT these stored files are not immediately accessible to you. VAULT maintains a database of backed-up files and allows you to:
There are three types of backups:
The type of backup job is specified by the MANAGER when he creates the
backup job. At most sites, the MANAGER will set up
daily incremental backups and weekly and/or monthly full backups.
Unloading backups might be scheduled daily, weekly, monthly or yearly
depending on the site. Check with your MANAGER to learn the schedule of
backups at your site.
2.9.2 The VAULT database
The VAULT database contains information about files that have been backed up. The internal structure of the VAULT database closely parallels the VMS DIRECTORY structure, in that it is organized into directory files that are linked in an identical manner as the on-line directory files. The VAULT database also shows which backup files exist so that you can first identify whether the file you need is available on a backup medium and secondly request the restoration of that file.
Without a program like VAULT the backups are not immediately
accessible to you. Instead, the VMS BACKUP command produces a
single file called a
saveset that contains compressed copies of all of the files backed up
during that run of the backup job. VAULT gives you the
necessary access to search through this saveset.
2.10 Overview of MCL Work Center
MEDIA, when used with the MCL (Menu Command Language) Work Center, provides a graphical menu/forms environment that makes handling media, files and jobs easier. Whether you work on an ANSI VT terminal or a DECwindows workstation (or X terminal) you can take full advantage of this intuitive system to perform the most complex of MEDIA tasks.
Any function, from allocating a new medium to restoring a file can be accomplished with a few menu selections. Of course for those who prefer to use a command line interface, all features are equally accessible at the DCL command line level.
When you're ready to begin an MCL session with MEDIA as the main application, use the following commands.
For an ANSI VT terminal:
$ MCL/STARTUP=MED_STARTUP |
For a DECwindows workstation, add the following definition to the "Customizing Applications Definitions":
Menu item: Media Librarian Menu command: @MCL_LIBRARY:MCL_DECW_START MED_STARTUP x |
Replace the "x" with S for small fonts or M for medium fonts. The "S" small fonts are appropriate for a normal resolution workstation. The "M" fonts are appropriate for a high resolution monitor.
If you have already added an "MCL Session" entry to the applications menu you can skip the above step and just select the "Media Librarian" option from the top level MCL menu.
Whether on an ANSI VT terminal or a DECwindows workstation, the user
interaction with MCL will be basically the same. The text in
the menus, forms, and displays is identical (except for the
Exit item provided for most of the VT menus). The use
of the keyboard to select menu items and enter data into forms is
identical. Of course, the availability of the mouse on a DECwindows
workstation gives extra capability not provided on a VT terminal. Also,
on a DECwindows workstation, menus and forms can be resized, moved or
reduced to an icon.
2.10.1 Menus
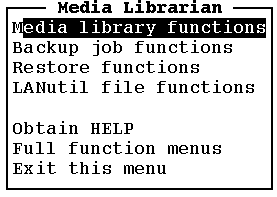
When MEDIA is invoked in MCL, the top menu appears on the screen, as shown in either Figure 2-4 VT Top Menu for a VT terminal
Figure 2-4 VT Top Menu

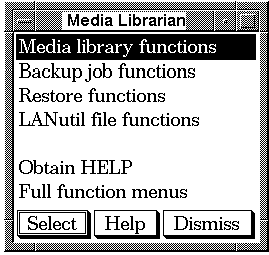
or Figure 2-5 DECwindows Top Menu for a workstation.
Figure 2-5 DECwindows Top Menu

Some menu items will vary throughout the software, depending on factors such as level of privelege or the type of job the user is working with. For instance the Top Menu will read "Configure the software" instead of "View MEDIA configuration" if the user is a MANAGER or an OPERATOR. The first step in making a menu selection, from any menu in MCL, is to highlight the desired menu item by moving the cursor to that item. For either a VT or a DECwindows menu, the up and down arrow keys (and for multi-column menus, the left and right arrow keys) will advance the highlight in the corresponding direction. For a DECwindows menu, a single click of the left mouse button on the desired menu item will highlight that item.
The second step in making a menu selection is to select the menu item for execution. For either a VT or DECwindows menu, pressing RETURN or SELECT will select the highlighted item. For a DECwindows menu, a double click of the left mouse button on the desired menu item will select that item. Also for a DECwindows menu, a single click of the left mouse button on the SELECT menu button will select the highlighted item.
For information on getting help for a menu item, see Section 2.10.5 "Brief Help Display".
To exit any VT or DECwindows menu, press EXIT (F10). In most VT menus, the last menu item is Exit this menu, which, when selected, will exit the menu. For all DECwindows menus, a single click of the left mouse button on the DISMISS menu button will exit the menu. Also, for all DECwindows menus, a single click of the right mouse button, anywhere within the menu area, will exit the menu.
The Top Menu is the one exception to this method of exiting. If you are trying to exit the Top Menu and there are no other SCHEDULE sessions running, you must select the Quit menu item to exit. When quit is selected, the software will completely exit MCL and return to the DCL prompt.
The keys (and the alias keys which perform the same function) relevant to menu and form selections are:
| Key | Description |
|---|---|
| [CANCEL] or [F6] | Interrupt this session and bring up interrupt menu. |
| [CTRL] + [C] | |
| [CTRL] + [Y] | |
| [EXIT] or [F10] | Exit this menu or form (and ignore changes in form). |
| [CTRL] + [Z] | |
| [REMOVE] | |
| [F7] | Delete all text in this field. |
| [F8] | Move cursor to top of menu and highlight that item or to top field in form. |
| [F9] | Move cursor to bottom of menu and highlight that item or to bottom field in form. |
| [F11] | Move cursor to right end of field in form. |
| [F12] | Move cursor to left end of field in form. |
| [F13] | Delete all text to the left of cursor in this field in form. |
| [INS/OVS] or [F14] | Toggle between insert and overstrike mode. |
| [HELP] | Display brief help description for highlighted menu item or current field. |
| [NEXT SCREEN] | Replace present page of menu selections with next page (only for multi page menus). |
| [PREV SCREEN] | Replace present page of menu selections with previous page (only for multi page menus). |
| [RETURN] | Select highlighted menu item for execution. |
| [SELECT] | |
| [DO] | |
| [ENTER] | |
| [DO] | Exit form and accept changes |
| <uparrow symbol> | move cursor up one menu item and highlight that item or to previous field in that form |
| <downarrow symbol> | move cursor down one menu item and highlight that item or to the next field in a form |
| <- | move cursor left one item and highlight that item (only for multi column menus or any form) |
| -> | move cursor right one item and highlight that item (only for multi column menus or any form) |
| Previous | Next | Contents | Index |