Enabling the CGI Web Service Extension on a Windows Server 2010 (IIS7)
- First, Create Handler Mappings for the CGI program executable in the Web Client properties. To do this:
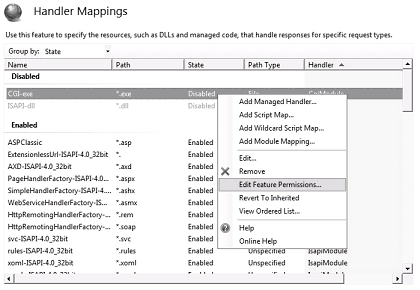
- Open the IIS Manager and select the ise virtual directory
- Double click on the Handler Mapping icon

- Right click on CGI-exe from the list of Disabled mappings and select Edit Feature Permissions from the drop down menu and proceed to step d. If the mappings are already enabled CGI is already enabled.
Note: If you do not see the CGI-exe mapping, click on Add Module Mapping... in the Actions column. Fill in the Add Module Mapping form as shown. Click OK. Proceed to step d.
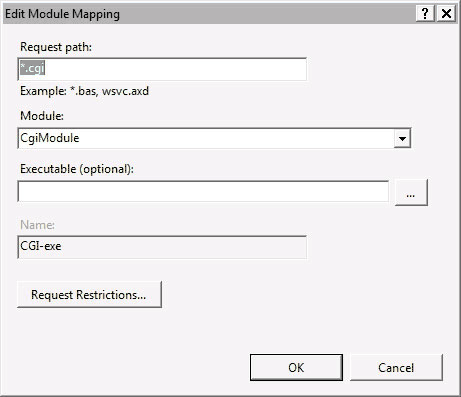
If CgiModule is not selectable from the Module dropdown list, CGI is not enabled. Go to the section Enabling the CGI role service in IIS 7.0 at the end of this article.
Note: Make sure the Request path field's value is *.cgi. The default of *.exe will not work.
- Right click on CGI-exe and select Edit Feature Permissions....
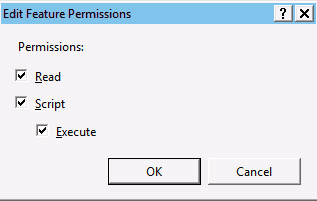
Make sure the the Read, Script and Execute checkboxes are all checked. Click OK.
- Do the same for the enterpriseschedule Virtual Directory.
- Add the CGI program executable to the Web Service Extension Restriction List (WSERL).
- Click on the Computer name in the left pane (root node in the tree)
- In the Features view, double click on "ISAPI and CGI Restrictions". You will find the list of extensions and their status.

- Click Add from Actions panel on the right
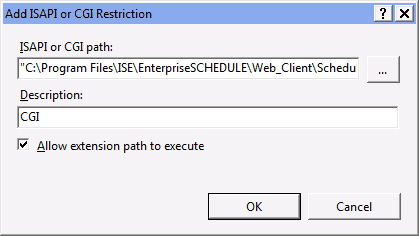
- Enter the path of the Schedule.cgi program under ISAPI or CGI path
(usually C:\Program Files\ISE\EnterpriseSCHEDULE\Web_Client\Schedule.cgi). IIS requires it to be in double quotes. - Enter CGI for a description.
- Check "Allow extension path to execute".
- Click OK.