| Previous | Contents |
Occasionally the directory names in the dialog box listings may not reflect the latest updates to the database. This may occur when the database has been changed outside of the session of the MOTIF Editor/Monitor. If you suspect the list is not current, the list may be updated using the Update Names selection.
In order to update all directory names, select Update
names from the Calendar menu.
2.6 Job
The job menu allows the user to create, display, modify, copy or delete jobs. Once the job has been created, it can be added to a job group window.
2.6.1 Create...
In order to create a new job, select Create... from
the Job menu. The job dialog box will appear, enabling
the user to choose the desired directory and job name.

After selecting the desired directory, enter the full job name after the directory name in the job name box. If the node needs to be changed, enter the node name in the Node name field and select the Apply button.
The Job Control Data window will appear with default data in all fields.
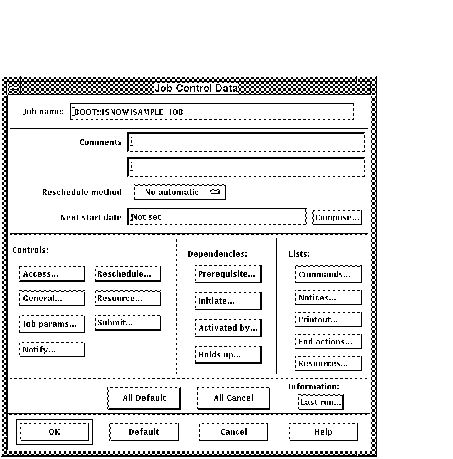
At this point, the characteristics of the new job can be defined. The various aspects of job data are accessible through fields and pop up dialog boxes. Each of these categories will be discussed in the following sections.
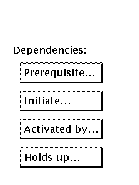
The Job Control Data is divided into four sections, each relating to a different aspect of job definition the four sections are: The general data section shown below,
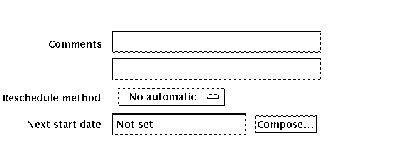
is used to input the basic comments and scheduling components of the job. The control data section shown below,

is used for creating the various job controls in the CONTROL record. The dependencies section shown below,
deals with the assignment of dependencies such as prerequisites and initiates. The lists and information sections shown below,
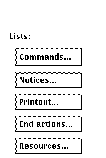
deals with the creation of lists to be used for commands, notices and
printouts and the latest status information on the job.
2.6.1.1 Controls
The controls section is made up of a series of buttons which bring up
forms. Each type of control data is explained in the following section.
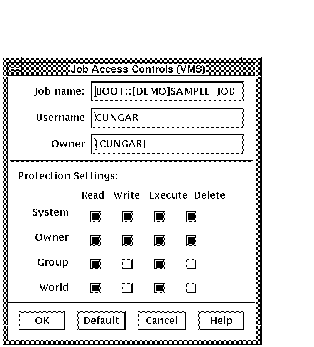
2.6.1.1.1 Access...
In order to set the access rights for the job, select the Access... button from the Controls section. The dialog box uses a simple method of choosing protection for each of the four classes. By toggling the corresponding radio button for READ, WRITE, EXECUTE and DELETE, the access rights can be set or reset.
The fields in the form can be filled according to the description in Section 2.2.1.2.
| Previous | Next | Contents |